

How to use DBT with Snowflake for Data Transformation
Introduction to Snowflake & DBT
What is DBT :
DBT stands for Data Build Tool, and it’s a tool that helps data teams transform raw data into clean, usable datasets using SQL.
Unlike traditional ETL (Extract, Transform, Load) tools that handle the entire data pipeline, DBT focuses only on the “T” — Transformation.
What makes DBT powerful is that it allows data analysts and engineers to write modular SQL code, just like software developers write application code.
It brings software development best practices to data work — like version control with Git, testing, documentation, and code reuse — making your data transformations more reliable, repeatable, and easier to maintain.
DBT can run either through the command-line interface (CLI) or on the cloud version, and it integrates well with most modern data warehouses, including Snowflake.
What is Snowflake :
Snowflake is a cloud-based data warehouse platform that allows you to store, process, and analyze large amounts of data without managing any hardware or infrastructure.
It runs on major cloud providers like AWS, Google Cloud, and Azure.
What sets Snowflake apart is its scalability, speed, and simplicity.
It separates storage from compute, which means you can scale up or down as needed and only pay for what you use.
It also supports multiple users running queries at the same time without slowing each other down.
Snowflake is especially popular in modern data stacks because it handles large-scale data operations efficiently, supports structured and semi-structured data (like JSON), and works seamlessly with tools like DBT, Fivetran, and Looker.
How to use DBT with snowflake
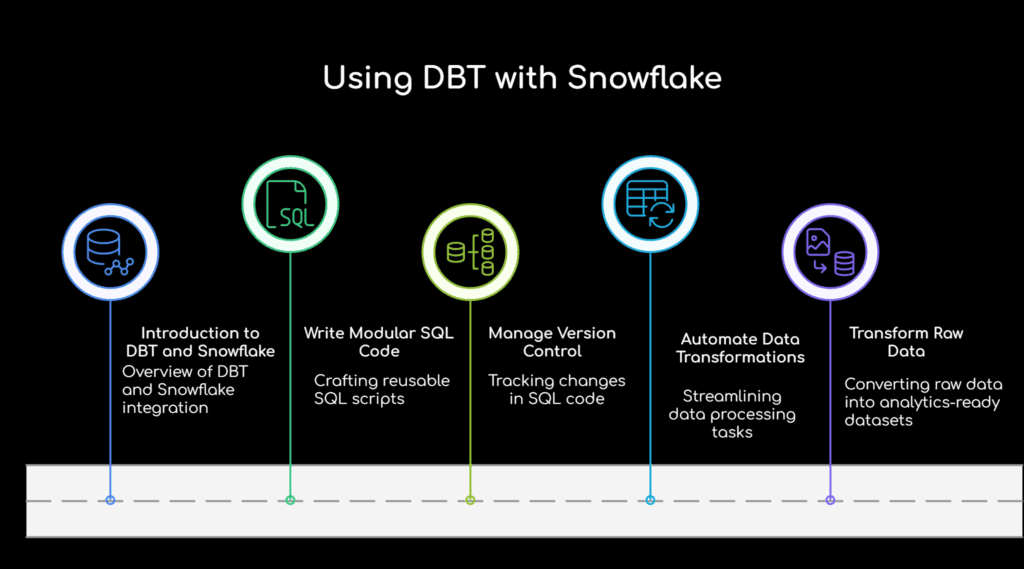
Using DBT (Data Build Tool) with Snowflake is a powerful way to transform raw data into trusted, analytics-ready datasets.
DBT helps data teams write modular SQL code, manage version control, and automate data transformations inside Snowflake’s cloud data warehouse.
Here’s a step-by-step guide to help you understand how to use DBT with Snowflake in a simple and practical way:
1. Set Up a Snowflake Account
First, you’ll need an active Snowflake account. If you don’t have one, sign up for a free trial on the Snowflake website. Take note of your account identifier, username, password, warehouse, and database — you’ll need them when connecting DBT.
2. Install DBT Locally or Use DBT Cloud
You can use DBT in two ways:
DBT CLI (Command Line Interface): Install via
pip install dbt-snowflakeDBT Cloud: A hosted version with a GUI interface, perfect for teams
For beginners and teams, DBT Cloud is easier to start with and supports direct integration with Snowflake.
3. Initialize a DBT Project
Once DBT is installed, create your project:
dbt init my_snowflake_project
This sets up a folder with all the files you need: models, profiles.yml, and basic configuration.
4. Configure the DBT Profile for Snowflake
Inside your ~/.dbt/profiles.yml file, define your Snowflake connection:
					my_snowflake_project:
  target: dev
  outputs:
    dev:
      type: snowflake
      account: your_account_id
      user: your_username
      password: your_password
      role: your_role
      database: your_database
      warehouse: your_warehouse
      schema: your_schema
      threads: 4
This tells DBT how to securely connect to Snowflake.
5. Write DBT Models (SQL Files)
In DBT, a model is just a SQL file that represents a transformation. You save these in the models/ directory.
Example:
					SELECT
  customer_id,
  COUNT(order_id) AS total_orders
FROM {{ ref('orders') }}
GROUP BY customer_id
DBT compiles and runs this SQL inside Snowflake, materializing it as a view or table.
6. Run and Test Your Project
To execute your transformations:
dbt run
To check logic and data quality:
dbt test
These commands run SQL inside Snowflake, allowing you to build data pipelines with ease and confidence.
7. Schedule Jobs and Monitor in DBT Cloud
If you’re using DBT Cloud, you can:
Schedule jobs to automate transformations
Monitor run history
Set alerts for failures
This helps teams manage production-grade data pipelines.
DBT Snowflake Best Practices
DBT (Data Build Tool) is a popular open-source tool used to transform data inside a data warehouse like Snowflake.
It helps users write SQL queries in a structured way, manage dependencies between models, run tests, and document data pipelines.
When used with Snowflake, DBT helps improve the reliability, clarity, and performance of data transformations.
In this guide, we will explain the most useful DBT Snowflake best practices. These are important for anyone who is learning Snowflake or working on real-time data projects using DBT.
1. Use Incremental Models to Improve Speed and Save Cost
Instead of running all queries every time, DBT allows you to build incremental models. This means only the new or updated data will be processed. It reduces the load on the Snowflake warehouse and makes the job run faster. Incremental models are very useful for large datasets.
2. Keep SQL Code Modular and Easy to Understand
Try to write small and clear SQL models. Break down complex logic into multiple smaller models instead of writing one long SQL query. This makes your work easier to understand and maintain, especially when the project grows.
For example, create separate models for staging, transformation, and final outputs.
3. Use Naming Conventions to Organize Your Models
Follow a consistent naming method for your models. A common pattern is:
- Use
stg_for staging models - Use
int_for intermediate logic - Use
fct_for fact tables - Use
dim_for dimension tables
This helps teams understand what each model is doing by just looking at the name.
4. Use the ref() and source() Functions Instead of Table Names
In DBT, do not use hardcoded table names. Always use the ref() function to refer to other models, and use source() to refer to raw data tables. This keeps the project flexible and helps DBT understand the order in which models should run.
Example:
					select * from {{ ref('stg_orders') }}
select * from {{ source('raw', 'customers') }}
5. Add Tests to Ensure Data Quality
DBT allows you to write simple tests to check if your data is correct. These tests can check for things like missing values, duplicate records, or broken relationships between tables.
Some common test types are:
Not null test: makes sure a column has no missing values
Unique test: checks that values in a column are not repeated
Relationship test: makes sure that one table links correctly to another
Adding tests can help catch data issues early and build trust in your data pipelines.
6. Automate DBT Runs with Git and CI/CD Tools
Use Git for version control. This allows you to track changes, roll back if needed, and work in teams.
Connect your DBT project with CI/CD tools like GitHub Actions or DBT Cloud to schedule model runs, test them, and promote them to production.
Automation ensures that your pipelines are reliable and run at the right time.
7. Modularize DBT Code
Modularizing DBT code means breaking complex SQL logic into smaller, reusable models. This helps keep the code simple, easy to understand, and easier to manage in large data projects. Each model should perform a specific task and build on previous models using the ref() function.
When working with DBT in Snowflake, it is important not to write long, complex SQL scripts in a single model. Instead, divide the logic into layers such as staging, intermediate, and final models. This makes the project easier to debug, scale, and maintain.
Why Modularization Is Important
Improves readability: Shorter SQL models are easier to read and understand.
Encourages reusability: You can use the same staging or intermediate models across different final models.
Supports team collaboration: Different team members can work on different parts of the logic without conflicts.
Simplifies testing: You can test each small model separately to catch errors early.
Reduces errors: Smaller models have fewer chances of having complex bugs.
Example Structure for Modular DBT Project
Staging Layer (
stg_): Clean and rename raw source data
Example:stg_customers.sql,stg_orders.sqlIntermediate Layer (
int_): Join and combine related staging models
Example:int_customer_orders.sqlMart or Final Layer (
fct_,dim_): Business-ready data for reporting or dashboards
Example:fct_sales_summary.sql,dim_customer_profile.sql
Good Practice Example
Instead of writing one long query for sales reports, you can:
Create a staging model for orders
Create another staging model for customers
Build an intermediate model to join orders and customers
Use a final model to calculate total sales and counts
Each model should only do one thing and refer to previous models using the ref() function.
State the Key Features of DBT
DBT or Data Build Tool, is widely used in modern data workflows for transforming raw data into clean, reliable datasets that support business intelligence, reporting, and analytics.
What sets DBT apart is its ability to bring software engineering principles into the data transformation process.
Below are the key features that make DBT a powerful tool for analytics engineers and data teams.
1. Modular SQL Model Development
- DBT encourages a modular approach to writing SQL.
- Instead of building large, complex queries, you can break logic into separate models and use the ref() function to manage dependencies between them.
- This modular structure makes code easier to read, maintain, and scale over time.
Advantages:
- Improves readability and maintainability of SQL code
- Encourages a layered approach (staging, intermediate, and final models)
2. Jinja Templating and Macros
DBT supports Jinja, a templating language that allows you to introduce logic into your SQL code.
You can create reusable blocks of logic using macros, apply conditionals, and use variables to make your transformations more dynamic and efficient.
Advantages:
- Reduces repetitive code
- Enables dynamic SQL generation
- Simplifies complex logic by abstracting it into reusable components
3. Automated Testing and Documentation
One of DBT’s strengths is its built-in testing framework.
You can define tests such as not null, unique, or even write custom tests to validate your data models.
DBT also generates documentation based on your project files and schema definitions, making it easier to understand and trust your data pipelines.
Advantages:
- Helps maintain high data quality and reliability
- Detects issues early in the transformation process
- Generates interactive and searchable documentation for your team
4. Version Control and Collaboration (Git Integration)
- DBT projects consist of plain text files, making them ideal for version control using Git.
- This allows data teams to adopt software development best practices like code reviews, branching, and version tracking.
Advantages:
- Enhances collaboration across teams
- Enables clear audit trails and change history
- Supports safer, peer-reviewed deployment processes
5. CLI and Cloud Versions
- DBT offers flexibility in how it’s used.
- The command-line interface (CLI) is ideal for developers who prefer local workflows, while DBT Cloud provides a fully managed environment with scheduling, logging, and collaboration features.
Advantages:
- Allows teams to choose between self-hosted and managed environments
- DBT Cloud supports job scheduling, user management, and a web-based IDE
- CLI is lightweight and ideal for developers working in a local or CI/CD setup
Benefits of Using DBT (Data Build Tool)
DBT (short for Data Build Tool) has become one of the most popular tools in modern data engineering, especially for teams working with cloud data warehouses like Snowflake, BigQuery, or Redshift.
Unlike traditional ETL tools, DBT is built specifically for transforming data inside the warehouse, making it a natural fit for the shift toward ELT (Extract, Load, Transform) pipelines.
Here are some of the key benefits of using DBT:
1. SQL-Based and Analyst-Friendly
One of DBT’s biggest advantages is that it uses pure SQL, which makes it accessible for data analysts and not just engineers.
You don’t need to learn a new programming language or framework—if you know SQL, you can start using DBT almost immediately.
This lowers the barrier to entry and enables more team members to contribute to data modeling.
2. Built-In Testing for Better Data Quality
DBT makes it easy to add automated tests to your data models.
You can write simple tests to check for null values, duplicates, or unexpected values—right alongside your SQL models.
This helps catch data issues early and ensures your data pipelines remain reliable as they scale.
3. Modular and Maintainable Code
With DBT, you can split your transformations into small, reusable models.
This modular structure makes it easier to build, understand, and maintain even large and complex data pipelines.
It encourages clean and organized code—something that becomes essential as teams and datasets grow.
4. Version Control and Collaboration with Git
DBT projects are just files and folders, which means they can be stored and versioned using Git.
This allows data teams to collaborate using branches, pull requests, and code reviews—just like software developers.
It also provides an audit trail, so changes are documented and reversible.
5. Auto-Generated Documentation
DBT can automatically generate rich, interactive documentation for your entire data project, including models, relationships, and descriptions.
This makes it easier for team members and stakeholders to understand the data structure and logic behind the transformations.
6. Improved Data Lineage and Transparency
Using DBT’s ref() function to link models together builds a clear dependency graph of your entire pipeline.
This not only helps visualize how data flows through the system, but also ensures models are executed in the correct order.
It improves transparency and trust in the data process.
7. Supports Modern Cloud Warehouses
DBT is designed to work natively with modern cloud data platforms like Snowflake, BigQuery, Databricks, and Redshift.
It takes advantage of their scalability and performance, allowing you to transform massive datasets quickly without having to move them elsewhere.
8. Cost-Efficient and Scalable
Because DBT runs transformations inside the data warehouse, there’s no need for expensive external processing tools or hardware. You pay only for the compute you use on your warehouse platform, making it cost-effective and easy to scale as your data grows.
Prerequisites of DBT (Data Build Tool)
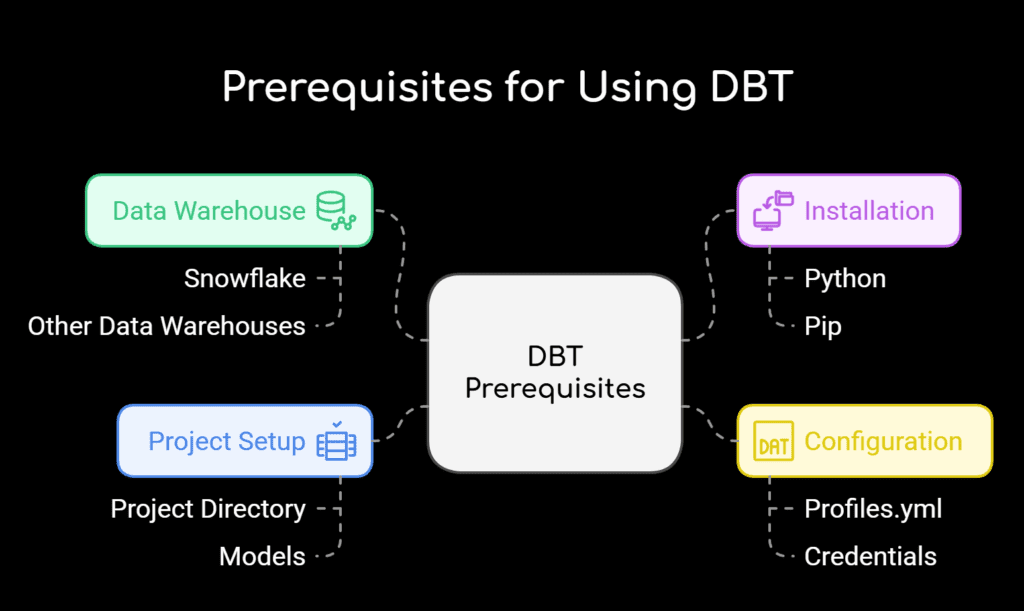
Before you start working with DBT (Data Build Tool) whether you’re using it with Snowflake or another data warehouse there are a few key requirements you need to meet.
These prerequisites ensure you can install, configure, and run DBT projects smoothly. Here’s a clear, professional breakdown to help you get started.
1. Basic Knowledge of SQL
DBT is built for analysts and engineers who write SQL. You don’t need to be a SQL expert, but you should be comfortable with:
- Writing SELECT statements
- Using JOINs, GROUP BY, and CASE logic
- Creating views or tables in a data warehouse
If you understand how SQL transforms data, you’re already in a good position to use DBT effectively.
2. A Supported Data Warehouse (e.g., Snowflake)
DBT doesn’t store data—it transforms it within a data warehouse.
So, you’ll need access to one of the supported platforms. Popular ones include:
- Snowflake
- BigQuery
- Redshift
- Databricks
- PostgreSQL, and more
For Snowflake specifically, you’ll need:
- A Snowflake account
- A database, schema, and warehouse set up
- Appropriate user roles/permissions to create tables, views, and run queries
3. Python Environment (for DBT CLI)
If you’re using the open-source DBT CLI (Command Line Interface) version, it runs on Python. You’ll need:
- Python 3.7 or higher
- pip for installing Python packages
- Optional: a virtual environment (e.g., venv or conda) to keep dependencies clean
Alternatively, if you’re using DBT Cloud, you don’t need to install Python locally—it runs in the cloud.
4. DBT Installation
Once Python is ready, you can install DBT via pip:
pip install dbt-snowflake
Make sure you install the adapter that matches your data warehouse (e.g., dbt-snowflake, dbt-bigquery, etc.).
5. Profiles Configuration (profiles.yml)
To connect DBT to your data warehouse, you’ll need to configure your credentials in a file called profiles.yml. This file includes:
- Account information (like Snowflake account name)
- Username/password or key-pair
- Warehouse, database, and schema
- Role (optional, but recommended)
It’s typically stored at:
~/.dbt/profiles.yml
6. A Code Editor or IDE
Since DBT projects involve writing SQL and YAML files, using a code editor will make development easier. Recommended tools:
- VS Code (most popular)
- Sublime Text
- JetBrains DataGrip
Many editors also support Git integration, syntax highlighting, and DBT extensions.
7. Optional but Helpful Tools
- Git: For version control and collaboration
- DBT Cloud account: If you prefer a hosted solution with UI, job scheduling, and collaboration tools
- Command line basics: Knowing how to navigate folders, run shell commands, and manage environments
DBT vs Snowflake: Understanding the Difference
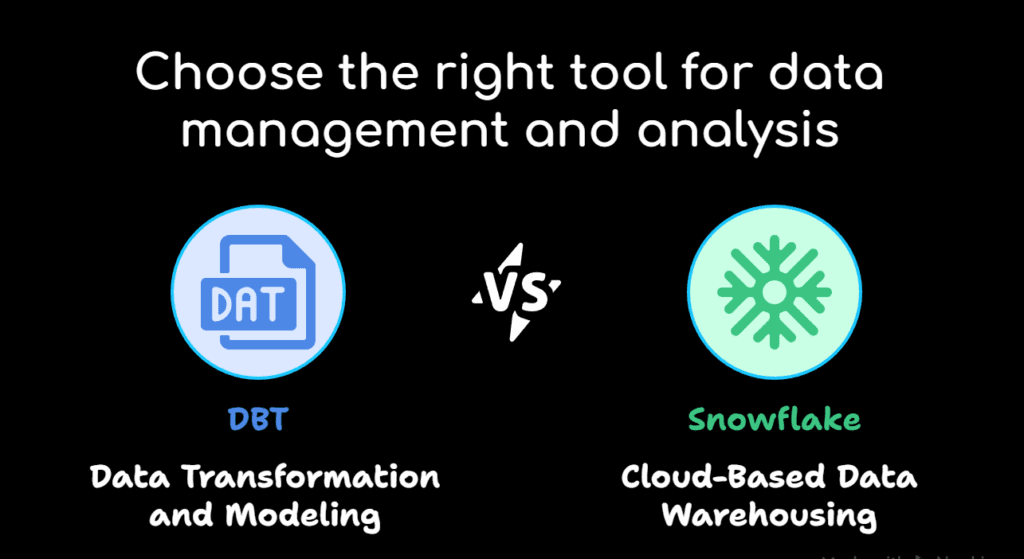
What DBT Does:
- Organizes SQL scripts into modular models
- Applies transformations using standard SQL
- Allows you to version control your data pipeline using Git
- Adds automated testing and documentation to your data workflow
Think of DBT as a software development tool for your data models.
What Snowflake Does:
- Stores structured and semi-structured data
- Executes queries using powerful compute resources
- Handles scalability and performance behind the scenes
- Integrates easily with tools like DBT, Fivetran, Tableau, and more
Snowflake is your data storage and processing engine.
Major key differences :
|
Feature |
DBT |
Snowflake |
|
Primary Function |
Data transformation (T in ELT) |
Data storage + querying |
|
Type of Tool |
Transformation tool (code-based) |
Cloud data warehouse platform |
|
Where it Runs |
Locally or in the cloud (DBT Cloud) |
Cloud infrastructure (AWS, Azure, GCP) |
|
Language Used |
SQL + Jinja templating |
SQL |
|
Data Storage |
Does not store data |
Stores and manages data |
|
Main Role |
Build clean, tested models |
Store, query, and scale data |
How to setting up DBT for Snowflake
If you’re working with Snowflake and want to make your data transformation process smoother, faster, and more maintainable, DBT (Data Build Tool) is the perfect companion.
In this section, we’ll walk you through the practical steps to set up DBT for Snowflake.
1. Choose How You Want to Use DBT: CLI or Cloud
Before diving into setup, you need to choose how you want to work with DBT:
Option 1: DBT CLI (Command Line Interface):
- Great for developers comfortable with the terminal.
- Gives full control over your local environment.
- Best suited for teams that already use Git and CI/CD tools.
Option 2: DBT Cloud
- A web-based platform provided by the creators of DBT.
- Easier setup, ideal for non-technical users.
- Built-in job scheduling, collaboration, and monitoring.
- For this guide, we’ll focus on the DBT CLI setup, which is open-source and free to use.
2. Install DBT Locally
To get started, install DBT using pip (Python’s package manager):
pip install dbt-snowflake
This command installs the Snowflake adapter along with the core DBT CLI.
Make sure Python (version 3.7 or higher) and pip are installed on your machine before running this command.
3. Create Your DBT Project
Once DBT is installed, create a new project using the following command:
dbt init my_dbt_project (Code idi)
Replace my_dbt_project with the name of your choice. DBT will generate a basic folder structure for your models, configurations, and documentation.
4. Configure Your Snowflake Connection (profiles.yml)
DBT needs to know how to connect to Snowflake. This is done by creating a configuration file called profiles.yml, which is stored in a hidden directory: ~/.dbt/.
Here’s a sample configuration:
					my_dbt_project:
  target: dev
  outputs:
    dev:
      type: snowflake
      account: your_account_id
      user: your_username
      password: your_password
      role: your_role
      database: your_database
      warehouse: your_warehouse
      schema: your_schema
      threads: 4
      client_session_keep_alive: false
Replace the placeholders with your actual Snowflake account details. You can find your account ID from the Snowflake web UI URL.
5. Test the Connection
Once your profiles.yml file is ready, test the connection to Snowflake:
dbt debug
If everything is set up correctly, you’ll see a success message confirming that DBT can connect to Snowflake.
6. Start Building Models
With your setup complete, you can now start writing models—SQL files that define how you want to transform your data. These models are stored inside the /models directory of your DBT project.
Run them using:
dbt run
And that’s it! You’ve now set up DBT to work with Snowflake.
How to Create first DBT Project ?
What You Need Before You Start:
Before you create your first DBT project, make sure you have the following:
- A working Snowflake account with proper roles and access
- Python installed on your system (for DBT CLI)
- DBT Core installed using pip, or access to DBT Cloud
- Basic knowledge of SQL
Step 1: Install DBT (if you haven’t already):
If you’re using DBT Core (CLI), open your terminal and run:
pip install dbt-snowflake
Tip: This installs DBT with the Snowflake adapter. You can also use pipx for a more isolated environment.
Step 2: Initialize a New Project
Navigate to the folder where you want to create your DBT project, then run:
dbt init my_first_dbt_project
You’ll be asked to select a database adapter—choose Snowflake.
This command will create a project folder with the following structure:
					my_first_dbt_project/
├── models/
├── dbt_project.yml
Each part of this folder plays a specific role. You’ll be working mostly inside the models/ folder at first.
Step 3: Configure Your Connection to Snowflake
DBT connects to Snowflake using a configuration file called profiles.yml. This file is usually located in:
- Mac/Linux: ~/.dbt/profiles.yml
- Windows: C:\Users\<YourUsername>\.dbt\profiles.yml
Here’s a basic example of what the Snowflake profile might look like:
					my_first_dbt_project:
  target: dev
  outputs:
    dev:
      type: snowflake
      account: your_account_id
      user: your_username
      password: your_password
      role: your_role
      database: your_database
      warehouse: your_warehouse
      schema: your_schema
      threads: 1
Make sure to replace each value with the correct information from your Snowflake account.
Step 4: Test the Connection
Once your profile is set up, test your connection with:
dbt debug
If everything is configured correctly, you’ll see a success message confirming the connection to Snowflake.
Step 5: Build Your First Model
Inside the models/ directory, you’ll find an example model file named example.sql. You can open it and edit the SQL query inside, or create your own:
					models/my_first_model.sql
SELECT
  id,
  first_name,
  last_name
FROM {{ ref('raw_users') }}
The ref() function is used to build relationships between models. For now, you can point this to an existing table in Snowflake to test it.
Step 6: Run Your DBT Project
To build your model in Snowflake, simply run:
dbt run
This compiles your SQL, connects to Snowflake, and creates the resulting tables or views based on your models.
Step 7: Explore the Output
After the run, log in to your Snowflake account and go to the schema you configured. You should see your newly created model (as a table or view).
Step 8: (Optional) Add a Test
Add a quick test to check data quality:
					models:
  - name: my_first_model
    columns:
      - name: id
        tests:
          - not_null
          - unique (Code idi)
Run:
dbt test
This checks if your id column is complete and has no duplicates.
Wrapping Up:
Congratulations! 🎉 You’ve just created your first DBT project and successfully connected it to Snowflake.
From here, you can start building more complex models, testing data quality, and organizing your SQL logic into reusable, modular blocks.
This foundation will make your data workflows cleaner, easier to manage, and much more reliable.
Data Testing and Documentation in DBT with Snowflake for Data Transformation
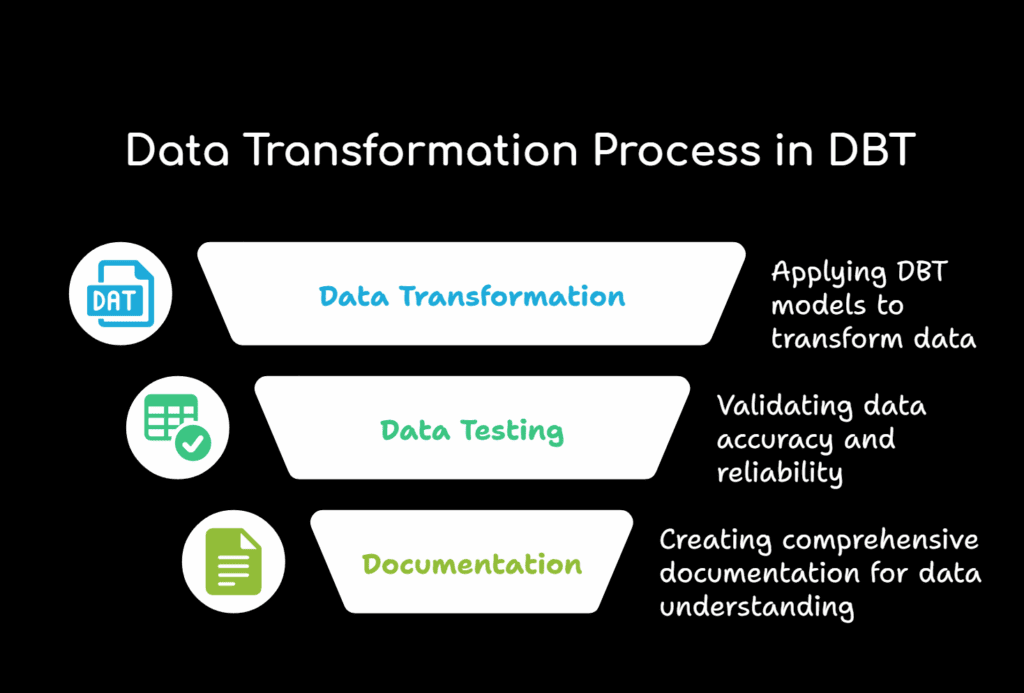
Ensuring your data is accurate, reliable, and well-understood is just as important as building the pipeline itself.
In the world of DBT and Snowflake, data testing and documentation are two essential practices that help teams maintain trust in their data while scaling operations efficiently.
Let’s explore what each of these involves and how you can implement them in your DBT project.
What is Data Testing in DBT?
Data testing in DBT is about validating the quality of your data after it has been transformed. Instead of waiting until a dashboard breaks or stakeholders report issues, DBT lets you catch problems early—at the modeling layer.
Types of Built-In Tests in DBT
DBT provides several out-of-the-box tests that are easy to use:
- not_null – Ensures a column has no missing (null) values
- unique – Confirms that all values in a column are distinct
- accepted_values – Checks that column values match a defined list (e.g., “Active”, “Inactive”)
- relationships – Verifies that foreign key relationships exist between tables (like joins)
When a test fails, DBT will tell you exactly which model and column caused the issue, helping you fix it fast.
dbt test
When a test fails, DBT will tell you exactly which model and column caused the issue, helping you fix it fast.
Why Data Testing Matters
- Trust: Business teams rely on accurate data to make decisions. Tests ensure the data is dependable.
- Efficiency: Catch issues before they reach dashboards or reports.
- Automation: Tests run every time your models are built—no need for manual QA.
What is Documentation in DBT?
Documentation in DBT makes it easy for teams to understand the structure and purpose of every model, column, and data source. Think of it as a living data dictionary generated from your code.
How it works ?
You write descriptions in your YAML files, like this:
					models:
  - name: orders
    description: "This table contains order-level data for the e-commerce platform."
    columns:
      - name: order_id
        description: "Primary key for each order."
Then, DBT can generate an interactive website with all your project documentation using:
					dbt docs generate
dbt docs serve
The result is a clean, searchable interface that includes:
- Model descriptions
- Column-level explanations
- Lineage graphs that show how data flows from raw to final tables
Benefits of Documenting Your DBT Models
- Team Alignment: Everyone knows what the data represents, reducing confusion.
- Faster Onboarding: New team members can quickly understand the data structure.
- Transparency: Stakeholders gain clarity on what’s behind their dashboards.
Source Freshness and Snapshots in DBT
What is Source Freshness in DBT?
In any data pipeline, it’s important to know how recent your source data is especially when you’re building dashboards or reports that rely on up-to-date information.
DBT’s source freshness feature allows you to check how “fresh” your data is by validating when a source table (like one in Snowflake) was last updated.
Why It Matters:
It helps ensure data accuracy and reliability. You can catch delays in upstream systems that feed your Snowflake tables. It builds trust with stakeholders by confirming that the data is timely.
How It Works:
- You define a source table in your sources.yml file.
- Add a freshness block specifying the acceptable delay (e.g., max 1 hour).
- When you run dbt source freshness, DBT checks the last updated timestamp on that source table.
- It compares this timestamp against your threshold and shows a pass/fail status.
					freshness:
  warn_after: {count: 1, period: hour}
  error_after: {count: 2, period: hour}
Best Practices:
- Use source freshness checks as part of your daily jobs or CI/CD workflows.
- Monitor the output regularly to catch upstream failures early.
- Set realistic freshness thresholds based on how often your source tables update.
What Are Snapshots in DBT?
While DBT models help you transform your data, snapshots allow you to track changes over time perfect for when your source system doesn’t retain historical data.
Real life Example:
Let’s say your CRM system (like Salesforce) only stores the latest status of each customer. But what if you want to analyze how a customer’s status changed over the last 6 months?
This is where snapshots come in.
What Snapshots Do:
- Capture point-in-time copies of source records.
- Track changes in fields over time (e.g., from “prospect” to “customer”).
- Store historical versions in Snowflake with valid-from and valid-to timestamps.
How to Use Snapshots:
- Create a snapshot using a .sql file in your snapshots/ folder.
- Define a unique key and the fields to track for changes.
- DBT will compare the current record with the previous one and insert a new row only if something has changed.
					{% snapshot customer_snapshot %}
    {{
      config(
        target_schema='snapshots',
        unique_key='customer_id',
        strategy='check',
        check_cols=['status', 'email']
      )
    }}

    SELECT * FROM {{ source('crm', 'customers') }}

{% endsnapshot %}
Snapshot Strategies:
- Check: Compares specific columns to detect changes.
- Timestamp: Uses a last-updated timestamp field to identify changes.
Source Freshness vs. Snapshots
Feature | Source Freshness | Snapshots |
Purpose | Check how fresh data is | Track changes in slowly changing data |
Output | Pass/Fail freshness status | Historical versions of records |
Used For | Data monitoring | Change tracking, SCD (Slowly Changing Dimensions) |
Stored In | Metadata and logs | Physical tables in your warehouse |
Performance and Optimization Tips for Using DBT with Snowflake
When working with DBT (Data Build Tool) and Snowflake, performance and cost optimization should be more than an afterthought they should be built into how you design, develop, and maintain your data models.
Snowflake is powerful, but without best practices, it can also become expensive and inefficient.
Below are practical, beginner-friendly tips to help you optimize both performance and costs while keeping your DBT projects maintainable.
1. Use Incremental Models Wisely
Instead of rebuilding entire tables every time you run your DBT project, consider using incremental models. These models only process new or changed data, which significantly reduces processing time and warehouse costs.
How it helps:
- Saves compute time
- Reduces warehouse usage
- Speeds up DBT runs
Tip: Always define a proper unique_key and use the is_incremental() Jinja function to control logic during updates.
2. Choose the Right Materialization
DBT offers several materialization strategies—view, table, incremental, and ephemeral. Each has its place:
- Use view for light, frequently updated transformations.
- Use table when performance is more important than storage.
- Use incremental for large datasets that don’t change completely.
Use ephemeral for lightweight logic reused in multiple models.
Tip: Don’t default everything to table; consider your data size and usage patterns.
3. Leverage Snowflake's Auto Suspend & Resume
Snowflake allows you to set your warehouse to auto-suspend after a period of inactivity and auto-resume when needed. This helps you avoid paying for idle compute time.
Tip: Set your dev and staging warehouses to suspend after 5–10 minutes of inactivity.
4. Monitor Query Performance
Use Snowflake’s Query History to monitor which queries take the most time or cost the most. If you see long-running queries, they may need to be optimized in DBT.
What to look for:
- Large table scans
- Repeated joins without indexes
- Complex subqueries
Tip: Use EXPLAIN plans in Snowflake to analyze query execution paths.
5. Use Ref() and Avoid Hardcoding Table Names
Always use the ref() function to reference other DBT models. This ensures that dependencies are properly tracked and allows DBT to build a clean DAG (Directed Acyclic Graph).
Why it matters:
- Keeps your project modular
- Ensures safe refactoring
- Enables accurate model dependencies
6. Apply Filters Early in Your Models
Filtering data earlier in your transformation logic reduces the amount of data processed later on. This makes queries faster and cheaper to run.
Example:
If you only need active users, filter them in your staging layer, not in the final report layer.
7. Optimize Warehouse Size for the Job
Using a large Snowflake warehouse for a small transformation is wasteful. Instead, match warehouse size to the complexity and volume of your job.
Tip:
- Use X-Small or Small for dev environments.
- Use Medium or Large for production jobs with high data volumes.
8. Use Jinja Macros to Reuse Logic
If you’re repeating SQL logic across multiple models, it’s better to create a macro. This makes your code DRY (Don’t Repeat Yourself), easier to update, and more efficient.
Example -Use cases
- Reusable date filters
- Standardized column aliases
- Consistent business logic across departments
9. Schedule Smartly
Avoid scheduling all DBT jobs at the same time. Staggering jobs helps balance warehouse load and prevents compute spikes.
Tip:
Use DBT Cloud’s job scheduler or external tools like Airflow or Prefect to manage timing.
10. Regularly Archive or Clean Old Data
Over time, large datasets can grow and slow down performance. Consider archiving historical data that is no longer queried or partitioning data where applicable.
Example:
Create a model that only processes data from the last 12 months if historical data isn’t needed daily.
Real-World Use Cases of Using DBT with Snowflake
The combination of DBT (Data Build Tool) and Snowflake is helping companies streamline their analytics workflows, improve data quality, and reduce time spent on manual data processing. Below are some practical use cases that show how organizations are applying DBT with Snowflake to solve real business problems.
1. Marketing Analytics for E-commerce Companies
E-commerce companies deal with large volumes of data from multiple sources—Google Ads, Facebook Ads, Shopify, and email platforms. DBT helps teams transform and clean this raw data into trusted datasets within Snowflake.
How it works:
- Data is loaded into Snowflake from ad platforms using tools like Fivetran or Airbyte.
- DBT models transform campaign data to calculate key metrics such as customer acquisition cost (CAC), return on ad spend (ROAS), and conversion rates.
- These models are scheduled to run daily so marketing teams always have up-to-date dashboards.
Outcome:
Faster decision-making, accurate performance tracking, and reduced reliance on manual spreadsheets.
2. Healthcare Data Pipelines for Reporting Compliance
In the healthcare sector, ensuring accurate reporting and maintaining data quality are critical. DBT is used to apply business logic, enforce data validation rules, and generate structured reports directly from Snowflake.
Example:
- Hospitals integrate data from patient management systems, insurance databases, and treatment logs into Snowflake.
- DBT is used to join and clean these datasets, detect missing values, and flag inconsistencies.
- Final datasets are then used for government reporting, clinical dashboards, and internal audits.
Outcome:
Improved data trustworthiness and reduced compliance risks.
3. Finance and Revenue Operations
Financial teams need reliable, up-to-date reports for revenue tracking, expense categorization, and forecasting. DBT enables automated financial modeling in Snowflake with clear version control and reproducibility.
Example:
- Raw billing and invoice data is loaded from Stripe or QuickBooks into Snowflake.
- DBT is used to build models that calculate monthly recurring revenue (MRR), churn rates, and customer lifetime value (LTV).
- Teams can test logic before deploying and track changes with Git integration.
Outcome:
Faster financial reporting cycles and fewer human errors.
4. Data Marts for Business Teams
Data teams often create department-specific data marts using DBT to give sales, HR, or operations teams curated, business-friendly datasets stored in Snowflake.
Example:
- A sales data mart may include tables for leads, pipeline stages, quota attainment, and performance metrics.
- HR might use models to calculate employee turnover, headcount growth, and training hours.
- DBT allows the team to manage all transformations in code, ensuring consistency and transparency.
Outcome:
Self-service analytics for business users with trusted and structured data.
5. Building a Modern BI Stack
For many companies, DBT and Snowflake are the backbone of a modern data stack connected to visualization tools like Looker, Tableau, or Power BI.
Example:
- Data is extracted and loaded into Snowflake.
- DBT prepares the transformed models with meaningful naming and definitions.
- BI tools connect directly to DBT models, enabling real-time, clean insights.
Outcome:
Data analysts spend less time cleaning data and more time generating insights.
DBT and Snowflake Tips and Best Practices
Using DBT (Data Build Tool) with Snowflake is a powerful combination for modern data teams.
To get most value from this setup, you need to follow some key practices that improve performance, reliability, and maintainability.
Below are practical tips and best practices that will help you work more efficiently and avoid common mistakes whether you’re just starting out or managing production grade pipelines.
1. Use Incremental Models for Efficiency
When working with large datasets, avoid rebuilding tables from scratch.
Use DBT’s incremental materialization to only process new or changed data.
Best Practice:
Define a unique_key and wrap your logic in the is_incremental() block. This keeps model runs fast and cost-effective in Snowflake.
					{% if is_incremental() %}
   WHERE updated_at > (SELECT MAX(updated_at) FROM {{ this }})
{% endif %}
2. Apply DBT Tests to Ensure Data Quality
Data testing in DBT is easy—and critical. Add tests like not null, unique, and accepted_values in your schema.yml files to catch errors early.
Example:
					columns:
  - name: user_id
    tests:
      - not_null
      - unique
This protects downstream analytics from bad data and makes debugging much easier.
3. Use ref() Instead of Hard-Coded Table Names
Always use the ref() function when referencing other models. It keeps your dependency graph accurate and lets DBT handle the build order automatically.
Correct way:
SELECT * FROM {{ ref('orders') }}
Wrong way:
SELECT * FROM analytics.orders
4. Leverage Macros and Jinja for Reusable Logic
DBT supports Jinja templating, which allows you to reuse SQL snippets. Use macros for filters, transformations, or anything repeated across models.
Tip :
Create a macros/ folder and store common logic there. It keeps your project DRY (Don’t Repeat Yourself) and easier to maintain.
5. Tag and Monitor Your Queries
Add query_tag values in your DBT profile to make it easier to track queries in Snowflake’s history view. This helps with performance analysis and auditing.
query_tag: dbt_transformations
6. Choose the Right Materialization Strategy
Not all models need to be physical tables. DBT offers different materializations: view, table, incremental, and ephemeral.
Best Practices :
- Use views for lightweight models
- Use tables for high-performance queries
- Use incremental for large datasets
Use ephemeral for temporary transformations
Choosing the right one reduces costs and speeds up runs.
7. Organize Your Project and Use Naming Conventions
Keep your project clean with consistent folder structure and naming. Group models by domain (e.g., staging/, marts/) and use prefixes like stg_ and fct_.
Example :
- models/staging/stg_orders.sql
- models/marts/fct_sales.sql
8. Separate Dev, Staging, and Production Environments
Use DBT’s target feature to manage multiple environments. This prevents test data from affecting production models.
target: dev
Define separate schemas for each environment in profiles.yml, like my_project_dev, my_project_prod, etc.
9. Take Advantage of Snowflake’s Auto Suspend & Resume
Configure your Snowflake warehouse to auto-suspend when idle and auto-resume when needed. This avoids unnecessary compute costs during inactivity.
Best Practices :
- Use smaller warehouses for development
- Reserve larger ones for production runs
10. Keep Documentation Up to Date
Use DBT’s built-in documentation features (dbt docs generate) to create a visual overview of your models and columns. Always include descriptions in your YAML files.
description: "Customer orders enriched with product and payment data"
Well-documented models improve team collaboration and reduce onboarding time.
Conclusion:
Bringing DBT and Snowflake together creates a powerful foundation for modern data workflows.
DBT helps you write clean, modular, and testable SQL, while Snowflake provides a fast, scalable, and cost-efficient cloud data warehouse.
When combined, they allow data teams to move faster, collaborate better, and build more trustworthy data pipelines.
Whether you’re a data analyst or engineer, using DBT with Snowflake helps introduce software engineering best practices—like version control, automated testing, and documentation—into your analytics projects.
It not only improves code quality but also boosts the reliability of the insights your business depends on.
As your data needs grow, this stack scales with you. From building your first model to implementing advanced transformations and CI/CD pipelines, DBT and Snowflake provide the flexibility and performance needed for both small teams and large enterprises.
If you’re just starting out, focus on learning the basics—project setup, model building, and testing. As you gain confidence, dive into performance tuning, snapshots, and automation.
With the right approach, you’ll soon have a well-managed, production-grade data transformation pipeline that delivers value at every step.
FAQ's
To use Snowflake with DBT, you need to configure a DBT project that connects to your Snowflake account.
This involves installing DBT, creating a project, and setting up a profiles.yml file that includes your Snowflake credentials.
Once connected, you can build SQL models, run tests, and manage your transformations using DBT commands like dbt run and dbt test.
In DBT, tables are created through SQL model files. You write your transformation logic in a .sql file, place it in the models folder, and run dbt run. By default, DBT creates views, but you can configure materialization to table in dbt_project.yml or within the model using {{ config(materialized=’table’) }}.
DBT connects to your data warehouse through the profiles.yml file. For Snowflake, you’ll need details like account name, user, password, role, warehouse, database, and schema. Once this file is configured correctly, DBT can securely connect and run transformations within your Snowflake environment.
When choosing a DataOps quality platform that works well with DBT and Snowflake, you should look for features that make your data workflows smooth, reliable, and easy to manage.
Below are the most important features to consider:
1. Native Integration with DBT and Snowflake
The platform should easily connect with both DBT and Snowflake without complex setup. It should support DBT runs, read metadata, and track data changes in Snowflake automatically.
2. Automated Data Testing and Validation
Look for built-in tools that can run automatic tests on your data. This includes checking for missing values, duplicates, or unexpected changes in data after every DBT run.
3. Data Lineage and Impact Analysis
The platform should clearly show how data flows from raw sources to final outputs. This helps in understanding dependencies between tables and models and is useful when something breaks or changes.
4. Real-Time Monitoring and Alerts
It should monitor DBT jobs and Snowflake queries in real time. If something fails or slows down, the platform should send alerts immediately so that you can fix the issue without delay.
5. Version Control and Git Integration
A good DataOps platform should support Git-based workflows. This allows your team to track changes in DBT models, test them, and review code before deployment.
6. Support for Metadata and Documentation
It should capture metadata such as column descriptions, model dependencies, and usage stats. This helps you build and maintain clear documentation for the entire pipeline.
7. Role-Based Access and Governance
Choose a platform that supports user roles and permissions, especially when working with sensitive data. It should control who can view or edit data pipelines and dashboards.
8. Cost and Performance Tracking
The platform should show how DBT runs and Snowflake queries are affecting your cost and performance. This helps in optimizing warehouse usage and reducing unnecessary spending.
DBT is a transformation tool that lets you build, test, and manage SQL models in your data warehouse.
Snowflake is the cloud data platform where your data is stored and processed.
In short, DBT transforms data, while Snowflake stores and processes it.
Yes, you can use DBT Core with Snowflake at no cost.
DBT Core is open-source and free to use locally.
However, Snowflake may incur charges based on data processing and storage usage.
Make sure your Snowflake trial or account settings are configured to manage usage efficiently.
DBT has a relatively low learning curve for users familiar with SQL. Most core functions like model creation, testing, and documentation are straightforward.
However, advanced topics like macros, incremental models, and CI/CD integrations may take more time to master.
DBT isn’t a full replacement for Apache Airflow.
DBT focuses specifically on the T (Transform) layer in ELT pipelines, while Airflow is an orchestration tool that manages workflows.
Many teams use both: DBT for transformation logic and Airflow to schedule and orchestrate it.
DBT has built-in testing capabilities that help ensure data quality.
You can define tests like not null, unique, accepted values, and relationships between tables in your YAML files.
DBT runs these tests and alerts you to any failures, helping maintain trusted, clean data.
DBT (Data Build Tool) is an analytics engineering tool that lets you transform data in your warehouse using SQL.
It integrates seamlessly with Snowflake by running SQL models directly inside your Snowflake environment.
This allows analysts to follow engineering best practices like testing, versioning, and modular design.
To set up DBT with Snowflake:
- Install DBT (via pip or use DBT Cloud)
- Initialize a DBT project with dbt init
- Create a profiles.yml file with Snowflake connection settings
- Build models and run dbt run
- Optionally, run dbt test and dbt docs generate
You don’t need to be an expert, but a good grasp of SQL is essential to get started with DBT.
Most of your work in DBT will involve writing SELECT statements, structuring transformations, and organizing SQL code in a modular way.
DBT optimizes transformations by leveraging Snowflake’s compute engine directly.
Features like incremental models and materializations (table, view, ephemeral) help reduce computation and improve pipeline efficiency.
You also avoid moving data out of Snowflake since all transformations happen in-database.
DBT Core is free to use locally, but using it with Snowflake may incur Snowflake usage charges based on the queries executed.
DBT Cloud (hosted version) is a paid service but offers a free tier for small teams.
DBT encourages using Git for version control. Your DBT project files (SQL models, YAML configs, tests) are stored in a Git repository.
This allows for collaboration, code reviews, rollbacks, and CI/CD pipelines—all while deploying transformations to Snowflake.
Security depends on how you configure access. DBT uses Snowflake credentials defined in profiles.yml or via DBT Cloud’s secure environment. You should apply role-based access controls in Snowflake, and never expose credentials in plain text. DBT Cloud also offers SSO and managed access.
To connect DBT with GitHub:
- Create a GitHub repository for your DBT project
- Initialize your DBT project locally and run git init
- Add the GitHub remote and push your code
Use Git branches for development and CI/CD workflows
Run dbt init <project_name> in your terminal. This creates a structured DBT project directory, including folders for models, tests, and configurations.
Follow the prompts to choose a database adapter (e.g., Snowflake) and set up your project configuration.
Hope you found good understanding about DBT with Snowflake for Data Transformation, with detailed explanations. Hope this helps you.