

Different types of stages in Snowflake
Introduction to stages in Snowflake
Snowflake stages are essential tools used for temporary file storage during data loading and unloading operations.
These stages allow users to move data in and out of Snowflake efficiently by acting as a buffer between external files and database tables.
Whether for personal testing or enterprise-scale data pipelines, understanding and utilizing these stages effectively can greatly enhance workflow performance.
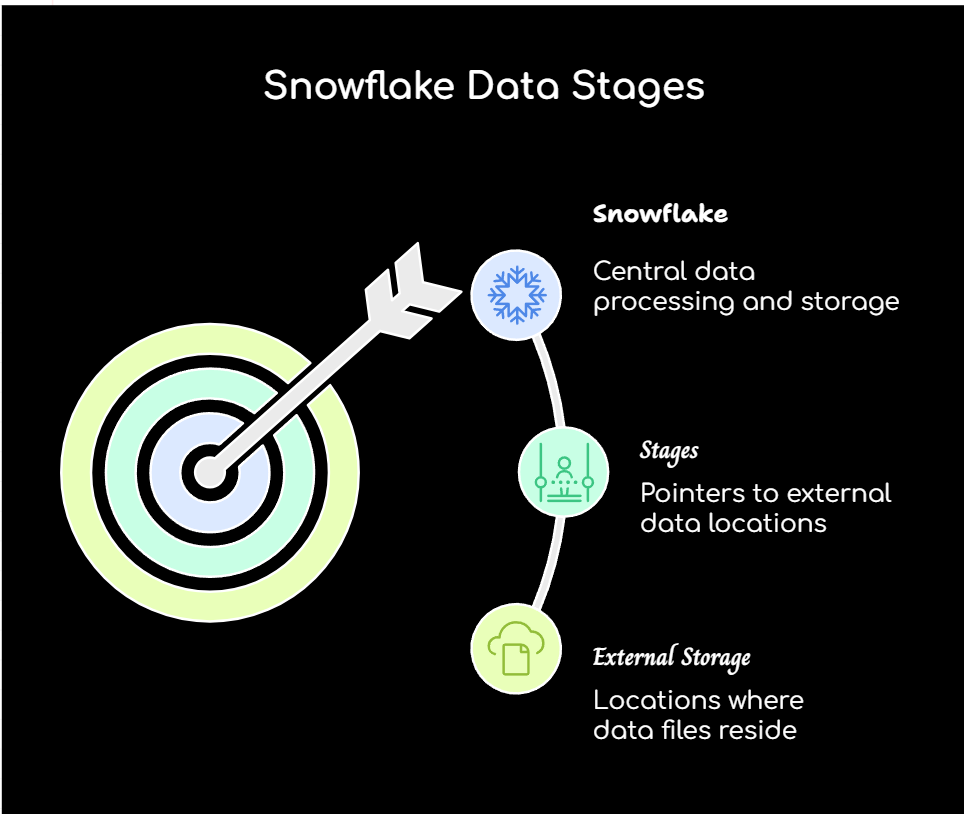
What is a Stage in Snowflake?
A stage in Snowflake is defined as a managed or external location used to store data files either temporarily or permanently. These files are used as the source or target for data loading (into tables) or unloading (from tables).
The purpose of a stage includes:
- Storing files before data loading using PUT
- Loading data into tables using COPY INTO
- Unloading data from tables using COPY INTO
- Downloading files using GET
- Deleting files using REMOVE
How to Create Stages in Snowflake?
Creating a stage in Snowflake allows files to be stored temporarily before they are loaded into tables or after they are unloaded. Stages can be either internal or external.
For Named Internal Stage:
A named internal stage is created using the CREATE STAGE command. These stages are managed entirely within Snowflake and don’t require cloud storage integration.
Example:
					CREATE OR REPLACE STAGE my_internal_stage
FILE_FORMAT = (TYPE = 'CSV' FIELD_OPTIONALLY_ENCLOSED_BY='"');
For External Stage:
External stages require connection to a cloud provider like AWS, Azure, or GCS. A STORAGE_INTEGRATION must be set up first to authorize access securely.
Example (Amazon S3):
					CREATE STAGE my_s3_stage
URL = 's3://my-bucket/data/'
STORAGE_INTEGRATION = my_s3_integration
FILE_FORMAT = (TYPE = 'CSV');
Best Practicies:
- Always define FILE_FORMAT for consistency.
- Use named internal stages when multiple tables or jobs need access to the same data.
- Keep stage names meaningful for easier management.
Different types of Stages in Snowflake
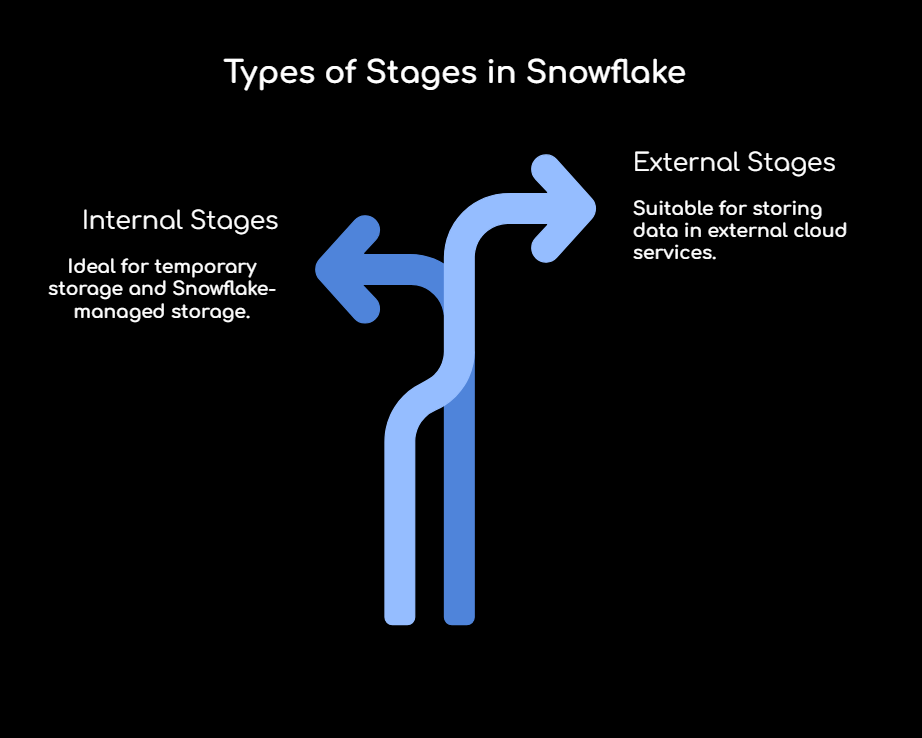
Stages in Snowflake are classified into two main categories: Internal and External stages.
Internal Stages:
These are storage areas managed entirely within Snowflake. They are recommended for small to medium-sized operations, and do not require cloud configuration.
1. User Stage
- Automatically provisioned for each user
- Accessed using @~
- Typically used for personal or development file staging
LIST @~;
2. Table Stage
- Tied directly to a specific table
- Accessed using @%table_name
- used when files relate specifically to that table
LIST @%sales_data;
3. Named Internal Stage
- Created manually for better control
- Can be reused across workflows
CREATE STAGE my_internal_stage;
External Stages:
External stages connect Snowflake to cloud storage services like AWS S3, Azure Blob Storage, or Google Cloud Storage. These require STORAGE_INTEGRATION for secure access.
Creating External Stage for Amazon S3
					CREATE STAGE s3_stage
  URL='s3://mybucket/data/'
  STORAGE_INTEGRATION = my_s3_integration;
Creating External Stage for Azure Blob
					CREATE STAGE azure_stage
  URL='azure://mycontainer.blob.core.windows.net/folder'
  STORAGE_INTEGRATION = my_azure_integration;
Creating External Stage for Google Cloud Storage (GCS)
					CREATE STAGE gcs_stage
  URL='gcs://my_bucket/path/'
  STORAGE_INTEGRATION = my_gcs_integration;
Creating Snowflake External Stages for Amazon S3 Using Snowflake Web UI (Snowsight)
Creating an S3 external stage from the Snowflake Web UI (Snowsight) is a user-friendly process and does not require deep SQL knowledge.
Step-by-Step Process:
- Log in to Snowsight (the Snowflake Web Interface).
- Navigate to Data > Stages in the left menu.
- Click + Create > Select External Stage.
- Enter the Stage Name (e.g., my_s3_stage).
- Under Storage Service, choose Amazon S3.
- Enter the S3 Bucket URL, e.g., s3://my-bucket/folder/.
- Select the previously configured Storage Integration (like my_s3_integration).
- Optionally configure a File Format, or select an existing one.
- Click Create Stage.
Note :
- A Storage Integration must already be created via SQL to appear in the dropdown.
- File format can be defined separately or reused for multiple stages.
- Once created, files can be listed and managed using LIST @my_s3_stage;
Creating Snowflake External Stage for Azure
When Azure Blob Storage is being used for data loading or unloading, an external stage must be created. Azure integration ensures secure access.
Prerequisites:
- Azure Blob Storage account and container
- A STORAGE_INTEGRATION object in Snowflake linked with Azure IAM
SQL Example :
					CREATE STAGE azure_stage
URL = 'azure://mycontainer.blob.core.windows.net/folder'
STORAGE_INTEGRATION = my_azure_integration
FILE_FORMAT = (TYPE = 'CSV');
Key Notes :
- The azure:// prefix is used instead of https://
- The container URL should point to the specific directory (folder) within the container.
- The storage integration handles authentication using Azure’s service principal and OAuth tokens.
Verification :
Once the stage is created, its contents can be verified:
LIST @azure_stage;
How to Create a User Stage in Snowflake?
User stages are automatically created by Snowflake for each user. They do not require explicit creation using CREATE STAGE.
Characteristics:
- Each user gets a private stage automatically.
- This stage is accessible using the shorthand: @~
It is tied to the Snowflake user account and cannot be shared.
Example :
Uploading a file to the user stage using SnowSQL:
PUT file:///Users/mydata.csv @~ AUTO_COMPRESS=TRUE;
Loading into a table from user stage:
Uploading a file to the user stage using SnowSQL:
					COPY INTO my_table
FROM @~/mydata.csv.gz
FILE_FORMAT = (TYPE = 'CSV');
Listing contents of user stage:
LIST @~;
Benefits of user stage:
- Ideal for testing, development, or small file loads.
- No setup or SQL command is required to create it.
- Data is isolated per user, offering built-in security.
Differences Between Internal and External Stages
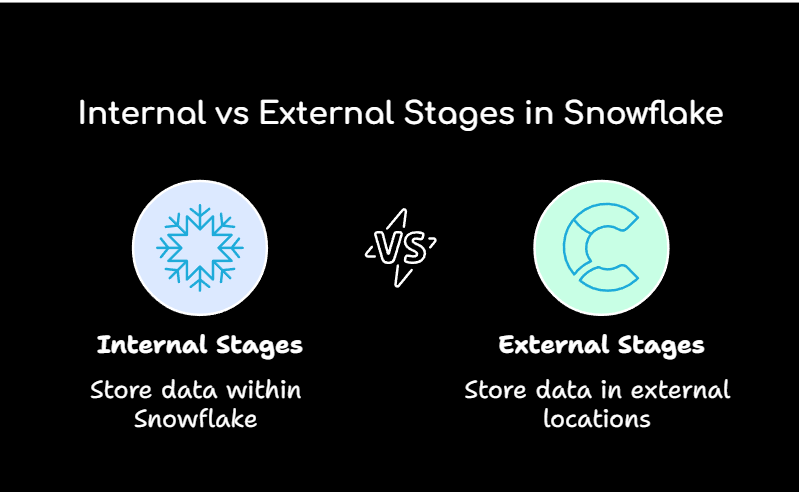
Feature | Internal Stage | External Stage |
Storage Location | Managed by Snowflake | Cloud storage (S3, Azure, GCS) |
Access Setup | Automatic | Requires storage integration |
Ideal Use | Testing, development | Enterprise-grade data movement |
Security | Built-in | Depends on cloud service |
Cost | Snowflake storage costs | Cloud storage costs |
Managing and Listing Stages
To view and manage stages, the following commands are used:
SHOW STAGES;
					LIST @my_internal_stage;
LIST @~;
LIST @%orders;
These commands help track which files are stored and how much space is being used.
Data Loading into Tables Using COPY INTO
Loading data from stages into Snowflake tables is done using the COPY INTO command.
Step-by-step Loading Process
- Files are uploaded using PUT (for internal stages)
- Tables are populated using COPY INTO
Example Internal Stage :
					COPY INTO orders
FROM @my_internal_stage/orders.csv
FILE_FORMAT = (TYPE = 'CSV' FIELD_OPTIONALLY_ENCLOSED_BY='"');
ExampleS3 External Stage :
					COPY INTO orders
FROM @s3_stage/2025/orders.csv
FILE_FORMAT = (TYPE = 'CSV');
Multiple files can also be loaded:
COPY INTO orders FROM @s3_stage/*.csv;
Unloading Data from Tables into Stages
Data from tables can be exported using COPY INTO back into internal or external stages.
Example - Unload to Internal Stage
					COPY INTO @my_internal_stage/exported/orders.csv
FROM orders
FILE_FORMAT = (TYPE = CSV HEADER = TRUE);
Example - Unload to S3 Stage
					COPY INTO @s3_stage/exported/orders.csv
FROM orders
FILE_FORMAT = (TYPE = CSV);
This process allows sharing and archiving of data.
Downloading Files to Local GET
Only supported with internal stages, GET allows downloading files to a local file system using SnowSQL.
GET @my_internal_stage/orders.csv file:///Users/downloads;
Uploading Files to Local PUT
The PUT command is used to upload files to an internal stage. It is executed using SnowSQL.
PUT file:///Users/data/orders.csv @my_internal_stage AUTO_COMPRESS=TRUE;
This ensures data is ready to be loaded into a table.
Removing Files from Stages with REMOVE
To delete files from a stage, the REMOVE command is used:
REMOVE @my_internal_stage/exports/orders.csv;
REMOVE @my_internal_stage/exports/*.csv;
This helps manage storage and clean up unused files.
Best Practices for Managing Snowflake Stages
- Named internal stages should be used for clarity and control
- External stages should be used for large and scalable operations
- Storage integrations should be configured for secure access
- Compression should be enabled for faster transfers
- Regular cleanup should be done using REMOVE
- Reusable file formats should be created
CREATE FILE FORMAT my_csv TYPE = CSV FIELD_OPTIONALLY_ENCLOSED_BY='"';
Snowpipe and Its Relation to Snowflake Stages
Here’s a detailed explanation about Snowpipe in the context of Snowflake Stages.
Deep Dive: Snowpipe and Its Relation to Snowflake Stages
What is Snowpipe?
Snowpipe is a serverless and continuous data ingestion service in Snowflake that automatically loads data from stages (internal or external) into database tables as soon as new files land.
Unlike manual data loading with COPY INTO, Snowpipe minimizes latency by processing data almost immediately.
It works by monitoring a stage, detecting new files, and applying a predefined COPY INTO command through a component called a Pipe.
Why Use Snowpipe?
- Manual loading becomes inefficient for high-frequency data ingestion.
- Real-time analytics requires immediate availability of fresh data.
- Automated ETL pipelines reduce human error and increase operational efficiency.
Hence, Snowpipe + Stages = Automated Real-Time Data Loading Pipeline
How Snowpipe Works with Stages: Step-by-Step
Let’s break it down with a clear point-by-point flow:
Step 1: Create or Use a Stage
You must have a stage (internal or external) that will serve as the landing area for your raw data files.
Example for External Stage (Amazon S3):
					CREATE STAGE s3_stage
  URL = 's3://mybucket/data/'
  STORAGE_INTEGRATION = my_s3_integration;
Step 2: Create File Format
Snowpipe needs to know how to interpret the incoming files.
					CREATE OR REPLACE FILE FORMAT my_csv_format
  TYPE = CSV
  FIELD_OPTIONALLY_ENCLOSED_BY='"'
  SKIP_HEADER = 1;
Step 3: Create a Pipe
The pipe defines the COPY INTO logic to be applied to every new file that lands in the stage.
					CREATE OR REPLACE PIPE my_pipe AS
COPY INTO target_table
FROM @s3_stage
FILE_FORMAT = my_csv_format;
Step 4: Enable Notification (Only for External Stages)
For Amazon S3, Azure, or GCS, event-based notification can be set up so Snowpipe gets triggered automatically when files arrive.
- AWS S3: SNS + SQS + Storage Integration
- Azure Blob: Event Grid Subscription
- GCS: Pub/Sub Integration
Snowpipe listens for these cloud events to start ingestion.
Example: Full Workflow with S3 External Stage and Snowpipe
- Files are pushed to S3 bucket → s3://mybucket/data/
- The external stage (s3_stage) points to this S3 path.
- A Snowpipe (my_pipe) is created to load files from @s3_stage into the orders table.
- S3 sends a notification → Snowpipe gets triggered.
Data is loaded into orders within seconds, without any manual action.
Example: Internal Stage with Snowpipe (Manual Trigger)
If using an internal stage (like a named internal stage), auto-trigger via cloud events is not supported. However, you can still use Snowpipe and manually notify Snowflake when new files are added.
Upload file using PUT:
PUT file:///data/orders.csv @my_internal_stage;
Notify Snowflake using REST API or SYSTEM$PIPE_FORCE_EXECUTION:
ALTER PIPE my_pipe REFRESH;
Monitor Snowpipe Status
Track which files are processed and their statuses:
					SELECT * FROM INFORMATION_SCHEMA.LOAD_HISTORY
WHERE PIPE_NAME = 'MY_PIPE'
ORDER BY LAST_LOAD_TIME DESC;
Advantages of Using Snowpipe with Stages
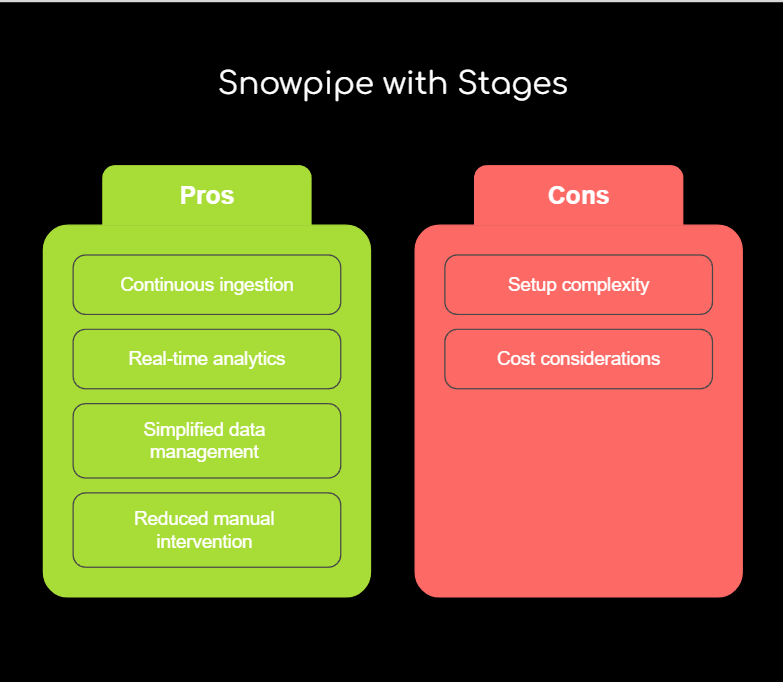
Benefit | Description |
⏱ Real-time Loading | Reduces latency by ingesting data instantly |
🧠 Intelligent Scaling | Snowpipe is serverless and scales with data volume |
🧩 Cloud Integration | Works well with S3, Azure, and GCS |
📦 Supports Internal & External Stages | Works across storage types with consistent logic |
🔄 Eliminates Manual Copy | No need to run COPY INTO commands manually |
📉 Lower Costs | Only pay for the data processed (per file) |
Use cases of Snowpipie in Real Life
- Streaming IoT sensor data landing every second in a cloud bucket
- Application logs continuously uploaded to a stage
- Marketing data feeds sent in hourly batches via external SFTP → staged in GCS
All these can be automated with Snowpipe and avoid writing dozens of scheduled ETL scripts.
Snowpipe vs COPY INTO Command
Feature | COPY INTO | Snowpipe |
Execution Type | Manual | Automatic or Event-driven |
Latency | High (batch-based) | Low (near real-time) |
Cost | Based on compute | Based on data ingested |
Maintenance | Manual scheduling | Fully automated |
Use Case | One-time/bulk loads | Continuous data feeds |
Best Practices with Snowpipe and Stages
- Use external stages with cloud event notifications for full automation.
- Organize files in date-partitioned folders (e.g., s3://bucket/data/YYYY/MM/DD/) for better tracking.
- Always define reusable file formats to avoid redundancy.
- Use VALIDATION_MODE = RETURN_ERRORS to check file compatibility before ingestion.
- Enable error handling using dead-letter stages (for failed files).
Summary: Stages + Snowpipe = Efficient Pipelines
Component | Role |
Stage | Storage location (internal/external) |
Pipe | Automation logic using COPY INTO |
Snowpipe | Orchestrator for continuous loading |
Snowpipe makes Snowflake truly real-time-ready. When combined with internal or external stages, it becomes a powerful backbone for production-grade ELT pipelines.
Conclusion:
Snowflake stages enable powerful, secure, and flexible data management. By understanding and using each type of stage effectively, teams can streamline both one-time and recurring data workflows.
Using commands such as COPY INTO, PUT, GET, and REMOVE, complete control can be maintained over file handling within the Snowflake ecosystem.
FAQ's
Stages in Snowflake are storage locations used for temporary data files before loading into tables or after unloading from them. These can be internal (managed by Snowflake) or external (connected to cloud platforms like AWS, Azure, or GCS). They help manage file-based data flows using commands like COPY INTO, PUT, and GET.
Snowflake offers three table types:
- Permanent Tables: Used for long-term storage with fail-safe recovery.
- Temporary Tables: Active only during the session and auto-deleted afterward.
- Transient Tables: Designed for temporary data without fail-safe, ideal for staging or intermediate data.
Criteria | Internal Stage | External Stage |
Storage Location | Inside Snowflake | On cloud (S3, Azure, GCS) |
Setup Needed | None | Requires integration setup |
Use Case | Testing, manual loads | Large-scale automation |
File Access | Simple via Snowflake | Access via cloud URL |
Security | Snowflake-managed | Managed through cloud IAM |
Two types are created automatically:
- User Stage: One per user, accessed by @~
- Table Stage: One per table, accessed by @%table_name
They require no setup and are ready for immediate use.
Named internal stages are created manually using SQL:
sql
CopyEdit
CREATE STAGE my_internal_stage;
These are ideal for organized data loading, reusable in multiple workflows, and easier to manage.
An external stage can be created like this:
CREATE STAGE s3_stage
URL=’s3://your_bucket/path/’
STORAGE_INTEGRATION = my_s3_integration;
Before this, a storage integration must be configured to connect securely to the S3 bucket.
The COPY INTO command is used:
COPY INTO target_table
FROM @your_stage/file.csv
FILE_FORMAT = (TYPE = CSV);
It allows data to be pulled from internal or external stages into Snowflake tables.
You can export data using the same COPY INTO command in reverse:
COPY INTO @my_stage/exports/file.csv
FROM source_table
FILE_FORMAT = (TYPE = CSV HEADER = TRUE);
This helps back up or share data externally.
- PUT: Used to upload files from your local machine to an internal stage.
PUT file:///path/to/file.csv @my_internal_stage;
- GET: Used to download files from internal stages to your local machine.
GET @my_internal_stage/file.csv file:///downloads;
These are available only with internal stages via SnowSQL CLI.
Snowpipe is an automated service that continuously loads data into Snowflake as soon as new files arrive in a stage. It works with both internal and external stages. A pipe is created to define how files from a stage are loaded into a table.
CREATE PIPE my_pipe AS
COPY INTO target_table FROM @s3_stage/data/ FILE_FORMAT = (TYPE = ‘CSV’);
You can view and remove files using:
LIST @my_stage; — lists files
REMOVE @my_stage/*.csv; — deletes all CSV files
Regular cleanups help save storage costs and keep the stage organized.
Yes, Snowpipe automates the data load. It detects new files in a stage and loads them into a table without manual triggers. You can enable event notifications (like AWS S3 triggers) for real-time ingestion.
External stages are secured through cloud IAM (Identity and Access Management). Snowflake doesn’t store cloud credentials directly. Instead, a storage integration is used to securely connect and manage permissions.
- Choose internal stages for quick testing, small to mid-size file loads, and ease of use.
- Use external stages for enterprise workflows, cloud automation, real-time pipelines, and when managing very large files.